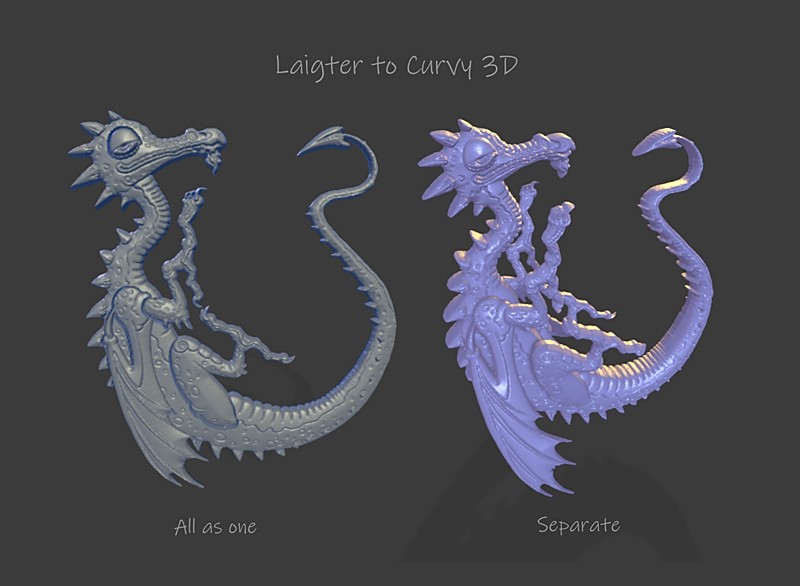
For this article I focus on how I turned an Illustrated 2D dragon into a rough base mesh using a program called Curvy 3D. I tried a few methods but this one was the easiest way to do it. I will discuss some other things I tried toward the end of the article and some workflow tips.
Creating the 2D images
First I used Krita to create a 2D image for this project using the brush tools.
After some experimentation I decided to separate the parts of the dragon (wing, leg, arm, head, beard, nostril, eye, body) using transparency masks (so as to to make normal maps for all the layers because this would then allow me to create separate 3D objects for these parts later on).
My previous article describes a method of using the Illuminate 2D Shape filter in G’MIC to create normal maps from images, however for this Illustration I decided not to use that method. This was because the dragon Illustration was a lot larger than the squirrels I used before and the line art was more complicated and not created using vectors. This meant that the G’MIC method was not as effective and much slower to use. Each method has their place, I’m not saying one is better than the other, but for this Laigter won out.
I saved the parts of the dragon on their own layers as .png format so that I could then import them into Laigter.
Creating normal and height maps in Laigter
Laigter is a great program for creating quick normal maps from 2D images / sprites. I’ve talked about it before on this blog in other articles.
The process is fairly simple, you drag your .png images into Laigter and then tweak the settings you want for the normal map. I also exported height map images from the program for each of the layers (you have to set the option in the parallax settings to use height map instead).
Height maps are grayscale images. The darker a value is the more it will recede in height, the lighter the more it will advance.
The height map for all the dragon parts together looks like this from Laigter:
Inflating Images in Curvy 3D
Once you have created your height maps you need to edit them for use in Curvy 3D. Make sure the background around the height map images is black (Black will be transparent) and save them all in .BMP format using Krita’s export options.
The Inflate image tool in Curvy 3D will only recognize this format. Go to extras menu and choose inflate image (you will need the latest version 4 or the version 5 beta to do this). This will open a window where you can tweak the settings and load your images. You can see the whole process for this in the video I made below.
This video shows a process importing multiple height maps into the program to assemble a 3D dragon, however you could just use the parts all together and create a bas relief version if you wanted. In the image below you may notice that the example on the right was an earlier version where I had not separated the parts for the fingers and toes.
Now you have your images turned into 3D meshes you can export them all together as an .obj file or export all the parts separately.
Just as an aside if you decide to do what I did in the video and create a symmetrical object on the X axis, I would export one side of the objects and then mirror them again in whatever program you may want to use to develop the model further just to make sure everything is symmetrical.
If you want to import the whole thing as one object then you may have to edit the object to make sure it is symmetrical so that when working with symmetry everything is OK. ZBrush has a mirror and weld option for this sort of thing, Blender has a mirror modifier and 3D Coat has options as well. I’m sure it is pretty common in most every 3d program that lets you use symmetry.
Other notes
3D Coat
3D Coat is a useful program for this workflow of creating 3D objects because after creating the objects you can then import them into the voxel sculpting room of 3D Coat ensuring any problems with the geometry will be fixed for you.
There is a new free version for 3D printing use which may be useful in this process called 3DCoatPrintbut I have the full version.
It is also useful for smoothing the noisy edges created when turning height maps into 3D objects without losing too much detail. Make sure to auto scale the first object you import for this, then the objects you import after will follow that scale and come into the file in the correct position.
3D Coat also has an image to mesh tool, but I found that using Curvy 3D to create multiple objects in one file was more effective.
3D Coat only lets you create a 2d to 3D object one at a time, which might be fine for some things like relief designs but not so good for moving multiple objects around unless you are patient enough to create each object in turn, export them, start a new file and keep doing that over and over until you can then re-import them together for arranging in 3D space.
The other problem was that it didn’t respect the transparent space of the .png layers (cropped it out apart from opaque areas) so it was a lot more tedious to get them in the right place on trying to import them together in one file than using Curvy 3D. Other than that it is still a really useful program, here are some things I made while testing it with the dragon:

ZBrush
Importing objects from Curvy 3D into ZBrush is possible but you will have to fix geometry issues which can be done using the dynamesh options. I found that smoothing the mesh created from Curvy 3D worked better in 3D Coat than ZBrush because more detail was preserved. The more you smooth the geometry the more detail is lost. Trouble is, increasing the geometry to get around this would make the mesh unworkable as a base mesh.
Personally I would probably fix mesh issues for this particular height map to 3D process using the voxel tools in 3D Coat and then use that exported object as a base mesh in ZBrush rather than going straight into ZBrush from Curvy 3d, but it is possible using ZBrush as long as you are OK with losing some details in the process to sort the geometry out first.
Blender
If you have a really powerful computer you could try using it to sculpt in Blender. Fixing the geometry might be a pain but I’m sure it could be done (I’m not going to do that though, I’ll use 3D Coat and ZBrush).
Other programs
Yes have a go in any 3d program you prefer. I’ve only mentioned the ones I have personal experience with in this article.
Thank you for reading the article I hope it was interesting.
Librepay .
Buy me a coffee .
Kofi .
Gumroad
Source link


