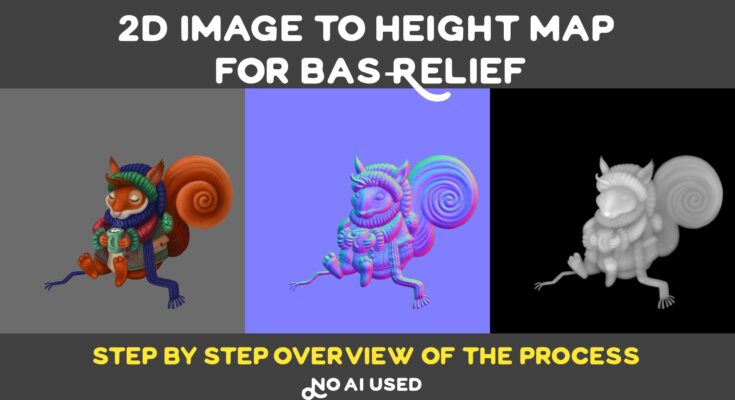
This is a step by step overview of the process for making a height map from a 2D image without using AI based tools. I’ve made a video to accompany this article.
I am also working on another project that I will record and document as a time-lapse one day.
What is this for?
The intended aim is to create a normal map and then a height map from a 2D image that can then be used in digital sculpting, CAD, CNC or 3D printing. The height map result will be useful for 2.5D bas-relief object creation and alphas for sculpting.

The normal map could be used in game engines and 3D renders for light effects and the height map may be useful for parallax effects.
The process I’m writing about and the video documents can be time consuming depending on the complexity and detail needed for an image, for non-photographic or very flat looking images it is best to have complete control of the process. This is for people who want a very specific result with a particular image or design (as most designers do).
It isn’t like the current AI methods for creating depth maps from 2D images, they tend to work better on images that already look 3D or are more photographic real life subjects with more depth information. I have also seen examples where people generate a 3D style using AI art generators for an input image and then make a depth map for that but the results tend to be random and uncontrollable.
The methods I’m writing about here are for people who need more control, but some of them could be useful to people who have used the AI methods as well if they wanted to edit and improve the results with manual editing and digital painting techniques. I tried this on another experiment I wrote about. You will need basic image editing knowledge and some digital painting and knowledge of sculpting in Blender is useful for some of the methods. If you need an image making I could possibly help with that…
1: Create a 2D image
2D images can be created in many ways from analogue methods to digital but for this example I used digital painting with PD Howler and Krita. It isn’t really important how it was created and that isn’t the focus of this article. The challenge of this particular image was to create all of the details in the final height map and get it looking more 3D. 1 Different images may use some but not necessarily all of the techniques I will discuss.
2: Getting things started using Laigter
lighter is a useful program that you can find on itch.io. It is developed by Azagaya, the program can be downloaded for free or pay what you want to support the developer.
In order to get a start on this image I imported it as a .png file with a transparent background into Laigter which creates a normal map for me. It does not use AI to do this. I left it on the default settings.
3: Create height map for the next step
The height map was also created in Laigter. You need to select the Parallax Map mode in the visualization tab on the right and then click the Parallax setting tab on the bottom left of the UI. Change the Type in the settings on the left to Height Map, then you can export the height map version of the image in the export settings in Laigter.
4: Sculpt a better normal map using Blender
The height map is useful for displacing geometry on a plane object in Blender and then once the displace modifier is applied it can be sculpted on with the sculpting brushes. I made a video of this process some time ago if anyone needs to see how I went about it.
I used the normal map mat-cap mode as a handy way to preview and render out the normal map once I was done with this step.
5: Extract Light directions from the normal map
I wanted to improve the results further with more accuracy and digital painting tools so I decided to use the light directions method I have written about before on this blog. To create starting reference for this I extracted the light directions from the normal map I made in the previous step using a channels to greyscale layers macro by James Ritson in Affinity Photo. The macro is available for free or pay what you want on his Gumroad page. The macro separates the RGB channels into greyscale layers. The red channel becomes the light from the right, the green channel becomes the light from the top and the blue channel becomes the light from the front.
In order to get reference for the light from the left and the bottom you can duplicate the right and top layers and add an invert layer adjustment to each of them. You won’t need to re-paint or use the one for the light from the front.
6: Hand paint better light directions
I used Krita to hand paint the light directions using the extracted light directions from the last step as initial reference. I used the lasso tool to isolate areas like the squirrels arm to keep edges sharp and the airbrush to create nice soft graduations. 2
7: Recombine the hand painted light directions into a new normal map
The hand painted light directions for left, right, top and bottom were combined into a new normal map. The technique is similar to the technical process of Image Based Photometric Stereo.
I used Sprite Lamp. There are other programs that can do this but I have had this one for several years and it still works so I used it. Unfortunately Sprite Lamp hasn’t been developed for quite some time now but I have written about this technique in this older article before if you need more information. Personally I still think the result created by Sprite Lamp is good and it works fast if you have a good GPU with larger images.
The process can also be done using Substance Designer Multi-Angle to NormalSpriteDlight (smaller images only), Shadermap, manually in Photoshop or using Blender. The author of the manual method in Photoshop (Michael Scaramozzino) has also made a filter for FilterForge and Lightwave.
NormalMap Online can also do this for free if you switch the input mode to pictures, set the strength to 1 and invert the red channel.

8: Create white “masks” for parts of the 2D image
I wanted to create more roundness for the parts of the squirrel so I created white silhouette shapes on separate layers. These layers were exported as .png images with no trimming. They are useful as transparency masks in step 10 as well.
9: Create normal maps for the masked parts in Laigter
The white shapes exported as non-trimmed .png images were imported into Laigter. Drag and drop the image from the bottom of the layer stack to the top of the layer stack so they will show correctly in Laigter. You will need to select all of the layers in Laigter for all of the layers to show in the preview. The normal maps for the masked images were then exported into the same directory as the imported images.
10: Combine the parts into one new normal map
I imported the normal map images for the parts as layers in Krita. I combined the normal map parts in Krita using the white shapes I’d painted before as transparency masks for each normal map part until they all showed together as one normal map.3
11: Blend the 2 normal maps in Krita
The normal map I made in step 7 and the one I just made in step 10 are now combined in Krita using the Combine Normal Map layer blending mode (found in the Misc category). I put the step 10 normal map above the step 7 one. I set the step 10 normal map to the combine normal map layer blending mode with a lower opacity so the one below shows through. It is really subjective as to the opacity to use but I set it around 39% for this one. Once that has been done the combined normal map can be exported as a .png file.
12: Extract the height map from the combined normal map
I used PixPlant 5 to extract a displacement map4 and made sure to set it to use the extract method to use Normals rather than the default diffuse image then set the source to the normal map I’d imported. The displacement map can be saved out as an image file. You will need to edit the image so that the background around it is black5.
13: Use the height map for digital sculpting (optional)
Height maps or alphas made using these methods can be used as a base for further work in digital sculpting software such as ZBrush if they need more details and adjustment. There are tools to create 3D models using the alpha images in ZBrush and 3D Coat which I’ve mentioned before on the blog.
Thanks for reading.
Footnotes
Please help support my blog
Liberapay .
Buy me a coffee .
Kofi .
Payhip .
Gumroad .
PayPal
Source link


