I wanted to get back into some straight up digital painting after doing a lot of digital sculpting lately. I started with a squirrel because I like them but I will pick other subjects as time goes on, including more fantasy themes. Here are some time-lapse videos and the written outline for the squirrel study.
I used Krita to do most of the work except for a colour layer wash in Rebelle 7 in preparation for the colour drawing stage. The reference photo was from Pexels by Skyler Ewing.
I chose to make a study of this reference image because I liked the pose of the squirrel and the variety of colours in the fur was interesting to me.
I used a Huion Kamvas 22 Plus tablet which I’ve had for several years and am very happy with.
Here are the video time-lapses for the drawing. Watching them may be useful for understanding certain parts of this article.
Settings and brush bundles in Krita
Before I tell you about the studies I want to go over some settings and brushes I use in Krita.
These are all the bundles I have active in Krita. I mainly used the Krita 4 Default Resources bundle and the Sketch V2 bundle for the first sketch.

Most of the bundles come installed with Krita, some are free bundles which I’ve downloaded from David Revoy (Deevad) or Ramon Miranda. There is one called memileo_360light by Emil Maselli which I found on the Krita Artists forum a while back. You may find more bundles on Krita’s official forum.
I like to organise my favorite brushes from these bundles by tagging them “mine” just so I can get to them faster without having to go through all the brushes constantly. I filter them to show up in the Pop-up Palette. I don’t use all of them on every project I do.
Usually only use a small selection at a time depending on what the art direction is. There are brushes for general digital painting, pencil looking brushes, ink styles and oil painting in my collection. You will probably want to bookmark different brushes depending on your own preferences.

The settings for the pallete can be accessed in “Configure Krita” from the Settings menu on the title bar.

I like to customise a few things in Krita, the cursor, display (to suit my own profiles), where the Swap file is located (I change it to a larger drive) and the Color Selector. All of this is really just my personal preference.


I also like to customise the Toolbar for BrushesAndStuff which is also from the Settings menu.

I’ve customised my layout in Krita by dragging things around into the various docker menus.

There is a great series of beginner videos on the official Krita YouTube channel if you want to learn how to customise your workspace.
Sketching The Squirrel (Part 1)
It may help you to watch the first video at the top of this article if you haven’t already done so but here is the written breakdown.
I started out by establishing the proportions of the squirrel by roughly sketching the shape of the squirrel with the SK2-07 Ghost Lines brush.

During this initial stage I also used the freehand selection tool and the Transform a Layer or Selection tool to move, resize and rotate things. This is one of the advantages of working digitally being able to do things like this.
Details and some lines were sketched in using the SK2-01 2B Details brush. Things were still very loose in this stage and I still selected elements with the lasso tool and moved, resized or rotated things around.
When I was happier with the proportions of the squirrel I made a new layer and lowered the opacity of the sketch layer (Paint Layer 4 in the video). I kept refining the outline of the sketch paying attention to the reference photo on my other monitor so I got the details looking better.

Hiding the rough blockout Paint Layer 4 I had the cleaner outlines for the squirrel. I still used the lasso and transform tool to alter things if I needed to on this layer. Another thing you could try is the liquify tool if things need adjusting.

I made a new layer and put it below the outline layer. This layer was for the rough greyscale value block in. I used the Charcoal Rock Soft brush for this. Things were pretty loose at this stage but I did use the lasso tool so I could block in values for the tail without having to worry about keeping in the lines.

I used a modified version of the Charcoal Rock Soft brush which uses the pressure of my tablet to change the size of the brush for smaller areas of detail like the eye.
After blocking in the rough values I blended everything using the SK2-12 Stump 02 Fibers brush. I like this brush because it blends very well, leaves subtle texures and doesn’t look too airbrushy.

I added another layer and sketched in some darker fur details with the Charcoal Rock Soft pressure brush. I added some details to the tree branch as well. With the SK2-12 Stump 02 Fibers brush I lightly blended some of the strokesmaking some areas look softer. I added lighter areas and highlights with the Charcoal Rock Soft pressure brush and blended them in until the sketch was done.

Colour version of the Squirrel (part 2)
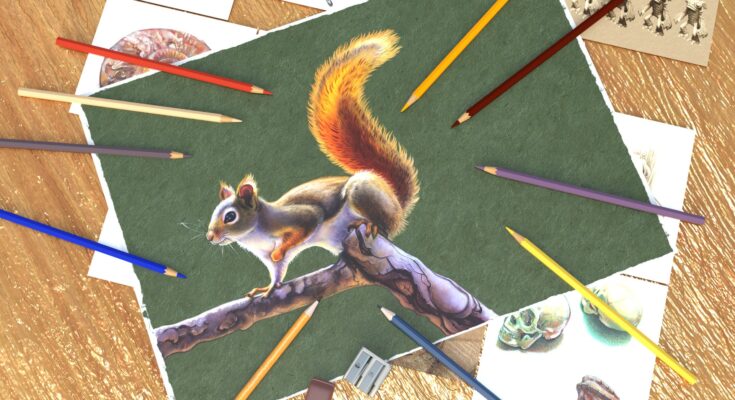
I wanted to make a more detailed coloured version of the squirrel in a pencil and pastel sort of style which are mediums I like to use if working traditionally. This image took a lot longer to make than the first one. This style can be tiring on the hands because of the tiny details so I took several breaks over around 2 days to do it. I think it took about 6 hours in total.
I used a little shortcut to get me started as I ran the first sketch through the Artistic Stylize filter in G’MIC (with one of the pencil styles I provided) to create a nice textured base to work with.
I also made a transparency mask for the squirrel in Krita, converted it into a paint layer and then imported that into Rebelle 7 with the squirrel image (they are the same as layer masks in Photoshop). If you want to see how to set a transparency mask I have a video here.
I wanted to use the watercolours in Rebelle to create a nice soft blended look. I loved the papers in Rebelle as well so I chose one and gave it a nice green colour. I could have stayed within Krita to do this of course but Rebelle was fun to use for this and I wanted to see how transparency masks worked in it.
Rebelle worked very well with the mask and meant I didn’t have to worry about staying within the lines as I put the colours onto a new layer with one of the watercolour wash brushes. I set the watercolour layer to “color” layer blending mode. I exported this image as a .png and went back to Krita. This is where the part 2 video starts because I didn’t record all of that.

Back in Krita I started by shading and layering more colours into the squirrel’s fur with the SK2-15 Waxy ColPen brush. This brush works best when there is already an opaque layer of something to work with so I made a copy of the squirrel layer and worked directly onto that.
I blended things in with the SK2-12 Stump 02 Fibers brush as I layered more colours into each other.

For line details I used the SK2-13 Sharpen ColPen Tilt brush.

I eventually made a choice to seperate the squirrel from the paper background which I should have done by exporting the layers seperately in Rebelle, by using the transparency mask for the squirrel on another copy of the layer. I wanted to refine the outline of the squirrel using the transparency mask but keep the paper background.

I used the Clone-Tool which is found in the brushes in Krita, not the toolbar, to clone the paper texture under this new squirrel layer with the mask. You have to use CTRL to pick a point on the layer with the part you want to clone it won’t work on transparent layers.

I continued adding fur details to the tail with the SK2-13 Sharpen ColPen Tilt brush with different colours on a new layer set to “multiply” blending mode. I colour picked colours from the tail and increased the saturation a little with the colour selector before I drew them. I made sure the direction of the fur growth followed the form of the squirrel by paying attention to the reference photo periodically. I wasn’t too concerned with copying every thing from the photo exactly but it helps to have reference for things like that and anatomical details.

I copied the transparency mask and saved another copy by duplicating it then converting it to a paint layer and hiding that in my layer stack.
I organised my layers by merging what I’d been doing down. I don’t generally like to work with lots of layers and it is good to save memory for program performance every so often. I added a copy of the transparency mask to another copy of the merged layers. Another thing I will do is save periodically and if I get to a stage where I think I might need to return or refer to, I will save an incremental file version.
I edited my transparency mask to refine the outline of the tail, then on a copy of the layer without the transparency mask below this layer cloned the paper texture under the parts I’d changed.

After that I continued adding fur details on a new layer with it set to “Multiply” blending mode as before.

Later I added another layer and left it on normal blending mode. This was for details I wanted to cover the other details with. Eventually I merged the layers down again and added another layer.

I keep adding layers in different blending modes as needed and merging every so often.
I added fur details to the outer edges of the tail.

I continued working on the details of the squirrel, it took a long time so I had to be patient. If I found myself getting frustrated I took a break. I suffer from a lot of chronic pain due to a slight problem with the alignment of my hips which is why I’ve tried getting more efficient with varying success over the years. Walking, stretching and taking breaks are the best things for it though.
I used another brush for where I wanted finer details called the Charcoal Pencil Medium.

I added the whiskers on a new layer with this brush.

I added an overlay and a screen layer to add lighter areas and highlights to the whiskers.

After that I merged things down again (I really don’t like working with loads of layers, you can if you want). I kept adding fur details and tree details with multiply layers and normal layers as required. Sometimes I merged everything down and worked on one layer if I didn’t need a particular blending mode. Using layers can be useful if you are experimenting with the direction or want the option to erase lines though.

Here is the Finished colour study of the squirrel.

Thanks for reading.
Please help support my blog
Liberapay .
Buy me a coffee .
Kofi .
Payhip .
Gumroad .
PayPal
Source link


