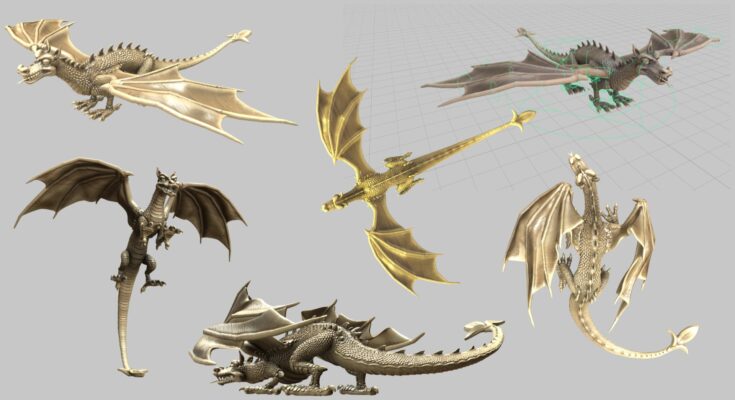
Hello there, earlier this year I made a 3D model of a dragon. It is loosely based on a drawing of Smaug that J.R.R. Tolkien made when he was writing “The Hobbit” and medieval Welsh dragons.
First I did some research by making drawing and painting studies. I also used some of this research to help when I made some custom scale VDMs for the sculpting process. I was looking at reptiles, bat wings and medieval dragon reference.

I blocked the dragon body and some of the other parts of the dragon like the spikes, claws, teeth and wings out using Curvy 3D. I imported these meshes into ZBrush and used Dynamesh to gradually sculpt better details using low resolution.

Working from low to high detail in Zbrush I kept working on the dragon until I got to a stage where I duplicated the mesh and created re-meshed objects for the body, teeth and eyes. I then subdivided these meshes and re-projected the details from the dynameshed objects back onto them.
I worked more details into the dragon and went over all the scales by hand. It took me ages!
Through doing this sculpt I found out how handy sub-tool folders are in ZBrush for more complex models and I also used the physics to help place the skin between the wings more realistically after I re-made the bones for them using ZSpheres.

After I was done with the sculpting I exported the low resolution meshes and the high resolution meshes for the dragon parts out separately for the UV mapping and baking process. I used 3D Coat to UV unwrap the meshes but I decided to use Substance Painter to do the baking this time.
Once I had learned the basics of the baking process in Substance Painter I thought it was a lot better to do than in 3D Coat which I often find quite frustrating and unintuitive for baking normals. I still think 3D Coat is a great program for UV unwrapping, texturing and hand painting though. Both programs are useful for different things.
When the un-wrapping and baking was done I exported the meshes out and used Blender to create a rig for the dragon so that I could make some cool dragon poses. I used an add-on called Auto-Rig Pro and a readymade dragon rig from the Rig Library by Joris.

Thanks for reading.
Please help support my blog
Liberapay .
Buy me a coffee .
Kofi .
Payhip .
Gumroad .
PayPal
Source link


