This article accompanies two videos I’ve made which may be useful if you are interested in making Bas relief images using 3D models.
In the two videos I discuss three methods of making alpha images using 3D models and compare the results at the end. It may be helpful to watch the videos before reading this article but I’ve tried to include some useful information here as well.
ZBrush
The first method uses ZBrush’s make Alpha tool. The tool is very easy to use if you have ZBrush. There are also bas relief projection from model tools within ZBrush. I have shown how I use this in the first video but there is plenty of online documentation on the subject.
Blender, Krita and PixPlant
The second method uses a mixture of software including Blender, Fell and PixPlant 5.
I developed this method of making Bas relief models using 3D models last year using various software and trial and error. It is a little bit complicated and time consuming but it gives better results than the ZBrush method and has other uses.


It is very useful for making bas relief images from posed models if you combine it with retopology, UV Mapping and the displacement map modifier. All of these things are quite technical and time consuming but I thought it might come in handy one day. I had to make myself a note sheet though because it is rather complicated. I’m not saying it is the definitive way or anything, there may well be better methods but I’m putting this here in case it is of use.
If anyone finds it useful and wants a Blend file please contact me. I can’t offer any more technical support other than that though, you will need to have basic knowledge of Blender, Krita and access to something like PixPlant to convert the textures to normal map or height map format.
Relief Maker
The third method I tried uses a new software called Relief Maker which I found this week completely by chance after watching YouTube videos on various subjects around 3D art techniques.
Full disclosure: I asked permission to write something up about the software and they kindly gave me a license to test out the software. (I’m still going to be unbiased of course which is why I’m mentioning other methods in this article).
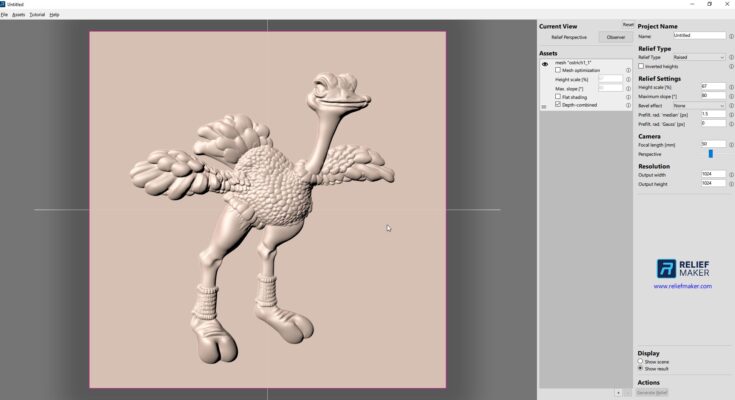
This is a very easy to use and effective software for making bas relief images from other 3D model angles. It has an advantage over the Blender method because it is better optimised to load more detailed models as it leverages GPU. One of the reasons I had to use the displacement map method in Blender was because larger models were too memory intensive to use. The Pro version lets you import multiple objects and normal maps.
I also tried it with one of my normal maps of a squirrel I made a while ago. Sort of makes a trapped Han Solo effect. I think the idea with using normal maps in the program is to make interesting combination effects with other 3D models rather than using them on their own.

I tested this program with a file I’d exported from ZBrush that would have crashed Blender and it worked with no problem. It was very fast with my GPU (Nvidia GTX 1660 Super).

Decimating high detail meshes first is a good practice though, especially if you want to use multiple models. They will load much faster for it and be less intensive to use. I have found that the 250k decimation preset in ZBrush preserves most details from my high detailed sculpts very well and really brings the file size down. I have to do this anyway if I want to bake textures in my other programs without it taking all day to load the model because although 3D Coat can cope with really dense models, Substance Painter and Blender can’t.
In the video I tested Relief Maker with a public domain model of a lion. There are links to several models you can use on their website.
Here are some more screen shots of my tests in the program.


Relief Maker is a new software from a company called Free LLC who also develop a CAD software which has been around for many years. It has a new launch discount at the moment with different license options depending on usage needs. You can also ask for a 7 day trial without export options.
I thought it was really easy to use and the export results for both the 3D objects and the images were very good, much better and easier than other methods I’ve tried.
As I have already discussed, making heightmaps into 3D objects is possible using other software but it is quite technical in comparison and does not capture the same level of detail as well unless you import an alpha from Relief Maker into ZBrush or 3DCoat which can support the high levels of subdivision needed.

In my opinion the alpha images from Relief maker were the best out of the three methods I tried but I will still use the other methods because they all have their uses. I honestly thought Relief Maker was the quickest and easiest to use and gave the best result out of those three methods though.
The website for Relief Maker is really good and there is a lot of documentation and helpful videos on how to use the software and how to use the results in other software. It is aimed toward people working in industries ranging from woodworking, coin design, lazer engraving, jewelry, mold cavity design, 3D CG, game development and art and sculpture. You could use it to create structure images for Rebelle 7 as well.
I think it would be useful for PixelCNC as well.

Thanks for reading
Please help support my blog
Liberapay .
Buy me a coffee .
Kofi .
Payhip .
Gumroad .
PayPal
Source link


